Pages

Showing posts with label Release Activities. Show all posts

Wednesday, August 7, 2013

Jenkins Failed to locate Cygwin installation. Is Cygwin installed?

Scenario:
 I configured a new Windows 64 bit node in Jenkins and when i try to execute a shell command from it, i got the below mentioned error.


FATAL: command execution failedhudson.util.IOException2: Failed to locate Cygwin installation. Is Cygwin installed? at hudson.plugins.cygpath.CygpathLauncherDecorator$GetCygpathTask.getCygwinRoot(CygpathLauncherDecorator.java:122) at hudson.plugins.cygpath.CygpathLauncherDecorator$GetCygpathTask.call(CygpathLauncherDecorator.java:127) at hudson.plugins.cygpath.CygpathLauncherDecorator$GetCygpathTask.call(CygpathLauncherDecorator.java:112) at hudson.remoting.UserRequest.perform(UserRequest.java:118) at hudson.remoting.UserRequest.perform(UserRequest.java:48) at hudson.remoting.Request$2.run(Request.java:287) at hudson.remoting.InterceptingExecutorService$1.call(InterceptingExecutorService.java:72) at java.util.concurrent.FutureTask$Sync.innerRun(Unknown Source) at java.util.concurrent.FutureTask.run(Unknown Source) at java.util.concurrent.ThreadPoolExecutor$Worker.runTask(Unknown Source) at java.util.concurrent.ThreadPoolExecutor$Worker.run(Unknown Source) at java.lang.Thread.run(Unknown Source)Caused by: hudson.util.jna.JnaException: Win32 error: 2 - null at hudson.util.jna.RegistryKey.check(RegistryKey.java:124) at hudson.util.jna.RegistryKey.open(RegistryKey.java:223) at hudson.util.jna.RegistryKey.openReadonly(RegistryKey.java:218) at hudson.plugins.cygpath.CygpathLauncherDecorator$GetCygpathTask.getCygwinRoot(CygpathLauncherDecorator.java:115) ... 11 more

Solution 1:
 Just add the "Shell" on the first line or your Execute Shell part. it may resolve the issue.
#!/bin/bash
Best Solution is don't mention any shell, so that it'll run the script whether on CMD / SHELL.

Solution 2:
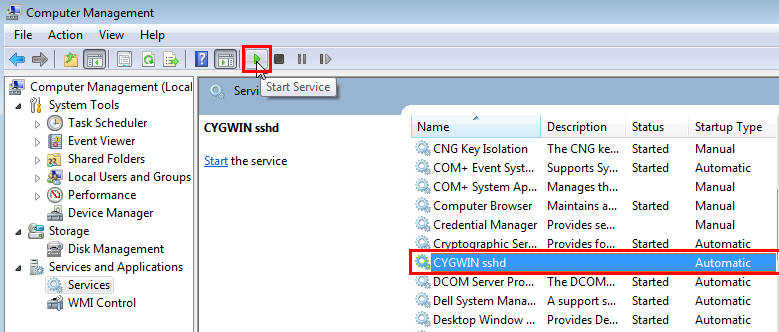
 Check if sshd service is running if not please follow the instructions.

Solution 3:
 If sshd service is not configured as a service in windows, then follow the instructions to create the service.

Solution 4:
 If sshd service is configured but starting saying "service started and stopped as no process is using the service". then check the below,
  1. Find the Cygwin log path, in my case C:\cygwin\var\log\sshd.log. if you observed,

@@@@@@@@@@@@@@@@@@@@@@@@@@@@@@@@@@@@@@@@@@@@@@@@@@@@@@@@@@@

@         WARNING: UNPROTECTED PRIVATE KEY FILE!          @
@@@@@@@@@@@@@@@@@@@@@@@@@@@@@@@@@@@@@@@@@@@@@@@@@@@@@@@@@@@
Permissions 0711 for '/etc/ssh_host_rsa_key' are too open.
It is recommended that your private key files are NOT accessible by others.
This private key will be ignored.
bad permissions: ignore key: /etc/ssh_host_rsa_key
Could not load host key: /etc/ssh_host_rsa_key

2. Then change the permission of the files like this, no write / now execute. Then i started the service, it came up.
$ chmod 600 ssh_host_*
-rw-------   1 cyg_server     None    988 Aug  6 14:40 ssh_host_key
-rw-r--r--+  1 cyg_server     None    652 Aug  6 14:40 ssh_host_key.pub
-rw-------   1 cyg_server     None   1675 Aug  6 14:40 ssh_host_rsa_key
-rw-r--r--+  1 cyg_server     None    407 Aug  6 14:40 ssh_host_rsa_key.pub
-rw-------   1 cyg_server     None    672 Aug  6 14:40 ssh_host_dsa_key
-rw-r--r--+  1 cyg_server     None    615 Aug  6 14:40 ssh_host_dsa_key.pub


cygwin sshd service is not starting

 Scenario :
            If it is a newly configured cygwin, then we need to run the exe to configure the service. please follow the below steps to configure and start the cygwin service. please follow the steps.


  1. Ensure cygwin\bin is in your PATH environment variable. If not are, add them by doing the following:
    1. Right-click on My Computer and go to Properties.
    2. In the System Properties window, click Advanced.
    3. In this tab, click Environment Variables.
    4. Here, search for the PATH system variable, select it, and if the cygwin\bin is not present in PATH, click Edit.
    5. In the Edit System Variable dialog box, Add the valuethen click OK.
  2. Check cyg_server user account is there in the system, else create it.
  3. start the cygwin,
  4. To install the SSHD service, run C:\cygwin\Cygwin.bat, and execute the following command:
    ssh-host-config
    
    After running the command, you are prompted the following questions:
    *** Query: Should privilege separation be used? <yes/no>: yes
    *** Query: New local account 'sshd'? <yes/no>: yes
    *** Query: Do you want to install sshd as a service?
    *** Query: <Say "no" if it is already installed as a service> <yes/no>: yes
    *** Query: Enter the value of CYGWIN for the deamon: [] binmode ntsec
    *** Query: Do you want to use a different name? (yes/no) yes/no
    
    At this point, if you want to use the same name, that is cyg_server, enter no. You are then prompted the following questions:
    *** Query: Create new privileged user account 'cyg_server'? (yes/no) yes
    *** Query: Please enter the password:
    *** Query: Renter:
    
    However, if you want to use a different name, enter yes. You are then prompted the following questions:
    *** Query: Enter the new user name: cyg_server1
    *** Query: Reenter: cyg_server1
    *** Query: Create new privileged user account 'cyg_server1'? (yes/no) yes
    *** Query: Please enter the password:
    *** Query: Reenter:
    
    If the configuration is successful, you will see the following message:
    Host configuration finished. Have fun!
    1. (domain user only) If the user you are employing to connect to the host on which you want to install the Management Agent is a domain user, do the following to start the SSH daemon:
      1. Right-click on My Computer, and select Manage.
      2. In the Computer Management dialog box that appears, go to Services and Applications, and select CYGWIN sshd.
      3. Right-click CYGWIN sshd and select Properties.
      4. In the Properties dialog box, go to the Log On tab.
      5. Here, specify the domain/user name and password. Click Apply.
      6. Run C:\cygwin\Cygwin.bat, and execute the following:
        chown <USERNAME> /var/log/sshd.log
        chown -R <USERNAME> /var/empty
        chown <USERNAME> /etc/ssh*
        chmod 755 /var/empty
        chmod 644 /var/log/sshd.log
        
        Note:
        If /var/log/sshd.log does not exist, you do not have to execute the following commands:
        chown <USERNAME> /var/log/sshd.log
        chmod 644 /var/log/sshd.log
        
    2. Perform one of the following steps to start the SSH daemon:
      Run C:/cygwin/Cygwin.bat and execute the following command:
      /usr/sbin/sshd
      OR
      Run C:/cygwin/Cygwin.bat and execute the following command:
      cygrunsrv -S sshd
      OR
      Perform these steps:
      1. Right-click on My Computer, and select Manage.
      2. In the Computer Management dialog box that appears, go to Services and Applications, and select CYGWIN sshd.
      3. Click CYGWIN sshd, then click the Start button.
      Surrounding text describes cygwin_start_service.jpg.
      Note:
      If the SSH daemon does not start up, view the c:\cygwin\var\log\sshd.log file for information on why the start up failed.
    3. You can now test your Cygwin setup.
      To do this, go to a different machine (that has the ssh client running), and execute the following command:
      ssh -l <USERNAME> <localhost> 'date'
      
      OR
      
      ssh -l <USERNAME> <this node> 'date'
      
      For example,
      ssh -l pjohn example.com 'date'
      
      This command will prompt you to specify the password. When you specify the correct password, the command should return the accurate date.

Monday, March 11, 2013

Encrypt the file or source code

GPG stands for Gnu Privacy Guard, is a tool used to sign and encrypt data. Here I'm giving a simple usage of this tool.


Usecase: We have a file on linux server, which needs to be encrypted and delivered to another machine.

Solution 1:- Encrypt a file
  • By default every linux server comes with "gpg" tool. You can verify by running the command "which gpg"
  • Use gpg command to encrypt your file
           cd TO_YOUR_FILE_LOCATION   (I need to encrypt a file named TEST)
           
           gpg -c TEST (It will ask for the passphrase/password, give a strong one and remember it)
           It creates a file named TEST.gpg, which is encrypted. You can take a look at the content of this file
  • Using gpg command for decryption
          Now I have transferred this encrypted file (TEST.gpg) to another server where gpg utility is available and run below command to decrypt it
         gpg -o TEST-d TEST.gpg
      
          Where -o option tells to create a file TEST, instead of printing output on console

Solution 2:- Encrypt the Source code or a folder
  • cd TO_YOUR_FILE_LOCATION   (I need to encrypt a file named TEST)
  • tar -zcf abc.tgz abc
  • Follow the command to encrypt
       
Strengthening encryption using AES256 cipher algorithm

Command to Encrypt
gpg --symmetric --cipher-algo aes256 -o abc-src.tar.gz.gpg abc-src.tar.gz
Enter passphrase: *******
Repeat passphrase: *******

Command to decrypt
gpg -d -o abc-src.tar.gz  abc-src.tar.gz.gpg
gpg: AES256 encrypted data
Enter passphrase: ******* 

Thursday, February 21, 2013

Fortify for ANT on Windows

Install Fortify client on Windows for ANT Project,

Installing Fortify on Windows 32 bit
  • First step is to check the version of Fortify 360 server, because most of the cases the SCA Install version should not be latest than server.
  • Download the Fortify archive Fortify-360-2.6.5-Analyzers_and_Apps-Windows-x86.zip and extract it to a directory like c:\fortify-2.6.5.
  • Be cautious on the Destination Directory, incase installation go under Program Files, we may fall under unnecessary problems during build process, in Cygwin Program\ Files won't work rather it fails the build process.
  • Get License file fortify.license, Since it require for installation.
  • Run utility scapostinstall.bat on Command Prompt under bin directory (C:\fortify-2.6.5\bin) to perform some necessary post install activities.
        ./scapostinstall
           [1] Migration...
           [2] Settings...
           [s] Display all settings
           [q] Exit
           Please select the desired action (1,2,s,q):

          Give valid entries for  Rulepack Update and 360 Server Settings

          Select 2 and proceed for changing settings. In Rulepack Update, give http address of your fortify 360 server for  Update Server URL: field. In 360 Server Settings, give again http address of your fortify 360 server for Server URL: field and set Get Rulepack Updates from 360 Server: true

  • Now update rules pack using tool rulepackupdate available at bin directory (/usr/local/fortify/bin) 
  • Generate Upload access token using utility fortifyclient under bin directory. The upload access token enable account and password information to be concealed during uploading of FPRs to Fortify 360 Server          
          fortifyclient.bat -url [360_server_URL] token -gettoken AnalysisUploadToken -user [AccountName]

          fortifyclient prompts for a password, type the password for [AccountName]. fortifyclient displays a token of the general form cb79c492-0a78-44e3-b26c-65c14df52e86. Copy the token returned by fortifyclient into a text filewe may pass this for the automated build process.

Updating rules in future

  • In case in future if you want to update rule packs, here is the process
  • You may get rules pack in a zip file of the form Se289787b-abd8-4ad6-a77d-f11d89e8ac60.zip 
          Then run the command
          C:\fortify-2.6.5\bin\rulepackupdate.bat -import Se289787b-abd8-4ad6-a77d-f11d89e8ac60.zip
  • or if your F360 server is up to date with rules, then run the command
           C:\fortify-2.6.5\bin\rulepackupdate.bat -url  [360_server_URL]

Tuesday, July 31, 2012

Perforce commands FAQ


1) How to delete a Perforce client?
p4 client -d 

2) How to copy named template's view to current client?
p4 client -t 

3) What is the use of P4CONFIG environment variable?
You can define Perforce environment variables in this configuration file. Place this file in your client root or even top-level directory. Perforce will fetch values from this configuration file.
For Ex: setenv P4CONFIG .p4config
cd $P4ROOT
vi .p4config
P4PORT=localhost:1666
P4CLIENT=client1

4) How to retrieve a file revision from Perforce depot?
p4 print -q //depot/source/proj1/test.c#5 > test.c

5) How to add the entire directory to Perforce?
find . -type f|p4 -x- add
find . -type l|p4 -x- add -t symlink

6) How to check who all working(opened) on a given file?
p4 opened -a 
7) How to list opened files that are different than the revision in the depot or missing?
p4 diff -sa

8) Listing unopened files that are missing on the client
p4 diff -sd

9) Listing unopened files that are different from the revision in the depot
p4 diff -se

10) Listing opened files that are same as the revision in the depot
p4 diff -sr

11) How to revert all files opened for edit but have unchanged content?
p4 revert -a

12) Locking an opened file against submission
p4 lock file-name
To unlock
p4 unlock file-name

13) How to list the differences between the 2 branches?
p4 diff -q //depot/main/jam/... //depot/rel1/jam/...

14) Deleting and re-adding files
% p4 delete file.txt
//depot/src/file.txt#33 - opened for delete
% p4 submit
Delete //depot/src/file.txt#34
Change 145 submitted
% p4 sync file.txt#33
% p4 add file.txt
%p4 submit
Add //depot/src/file.txt#35
Change 146 submitted